
If your little one is obsessed with video game heroes, this mario paper craft is going to be a guaranteed winner. It uses a few sheets of construction paper, takes about 30 minutes, and finishes with the most charming little mustachioed face that practically begs for a "It's a-me!" voice over. There is no painting, very little mess, and so many proud smiles at the end. 🍄
Toddlers can help with the easy gluing parts, and bigger kids can cut all the pieces and decorate the whole face on their own. Every finished version looks a little different, and that wobbly handmade charm is exactly what makes this paper mario craft feel so special.
Why Kids Love This Craft
For kids who already adore Mario, getting to make their very own version is pure joy. They already know the red cap, the big mustache, and the round friendly face, so each piece they glue down feels like magic snapping into place. When the last detail goes on, kids almost always grab the finished craft and act out little adventures with it right at the table.
This project is also wonderful for tiny hands. Cutting the oval face works on scissor control. Trimming the brim of the cap and the curved mustache takes a little focus, which is great practice. And gluing all those layers in the right spots gently teaches order and patience. It looks like simple play, but real fine motor learning is happening the whole time.
Best of all, this simple mario paper craft turns into a slow, screen-free moment together. You can chat about your child's favorite Mario games, invent silly little quests for the paper character, or make a whole family of versions in different colors. Those little side conversations are usually the part children remember years later.

What You'll Need
Here is everything you will need to make this easy mario paper craft at home. Lay everything out on the table before you start so the activity flows smoothly once your little one sits down.
- Crayola Construction Paper (240 sheets, assorted colors), you will need red, tan or peach, white, and brown sheets for this craft.
- Fiskars Training Scissors for Kids, spring-action and blunt-tipped, perfect for the small mustache and brim cuts.
- Elmer's School Glue Sticks (30-pack), washable and easy for little hands to twist open.
- DECORA Self-Adhesive Googly Eyes (assorted sizes), two per Mario face, peel and press.
- Crayola Washable Broad Line Markers, for drawing the nose, mouth, and small details.
- A pencil, for lightly tracing the face oval and the cap shape before cutting.
- A small bowl or jar lid, useful for tracing the round logo circle on the cap.
Step-by-Step Instructions
This mario paper craft step by step is genuinely easy to follow. Take it one little step at a time and let your child do as much of the work as they comfortably can.
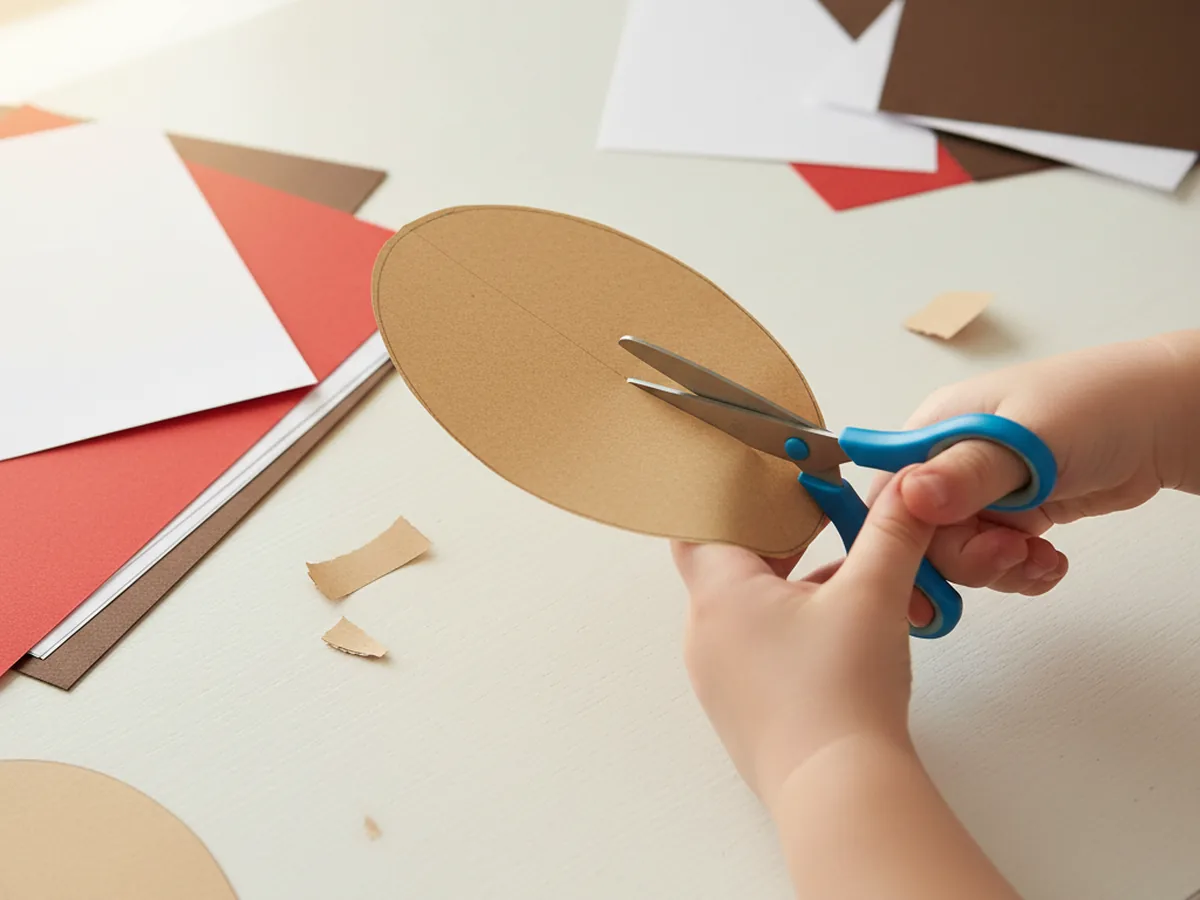
Step 1: Cut the Face Shape
Start with a sheet of tan or peach construction paper. Use a pencil to lightly draw a large oval, about six inches tall and five inches wide, in the middle of the paper. This oval will become the friendly round face. Once the shape is drawn, have your child carefully cut along the line. A slightly wobbly oval is totally fine and gives the mario paper craft a sweet handmade look.
For younger toddlers, pre-trace and even pre-cut the oval so they can save their cutting energy for the cap and the mustache later in the tutorial.
Step 2: Cut the Red Cap
Now for the most recognizable part. Take a sheet of bright red construction paper and draw a half-circle dome shape about five inches wide for the top of the cap. Just below it, draw a long curved brim that sticks out a little on the front, like a baseball cap visor. Cut both pieces out together so they form one shape, or cut the dome and the brim separately and overlap them when gluing.
Most kids light up the second they see the red cap take shape. It is the moment the paper craft starts looking like a real little character.

Step 3: Make the Cap Logo
Grab a piece of white construction paper and trace a small circle using a jar lid or the bottom of a glue stick. Cut it out. Then cut a chunky red letter M from a small scrap of red paper. Younger kids may need help with the M, since the angles can be tricky. Older kids usually love getting it just right.
If the M feels too hard to cut freehand, just draw a thick red M directly onto the white circle with a marker once it is glued to the cap. Both versions look adorable.
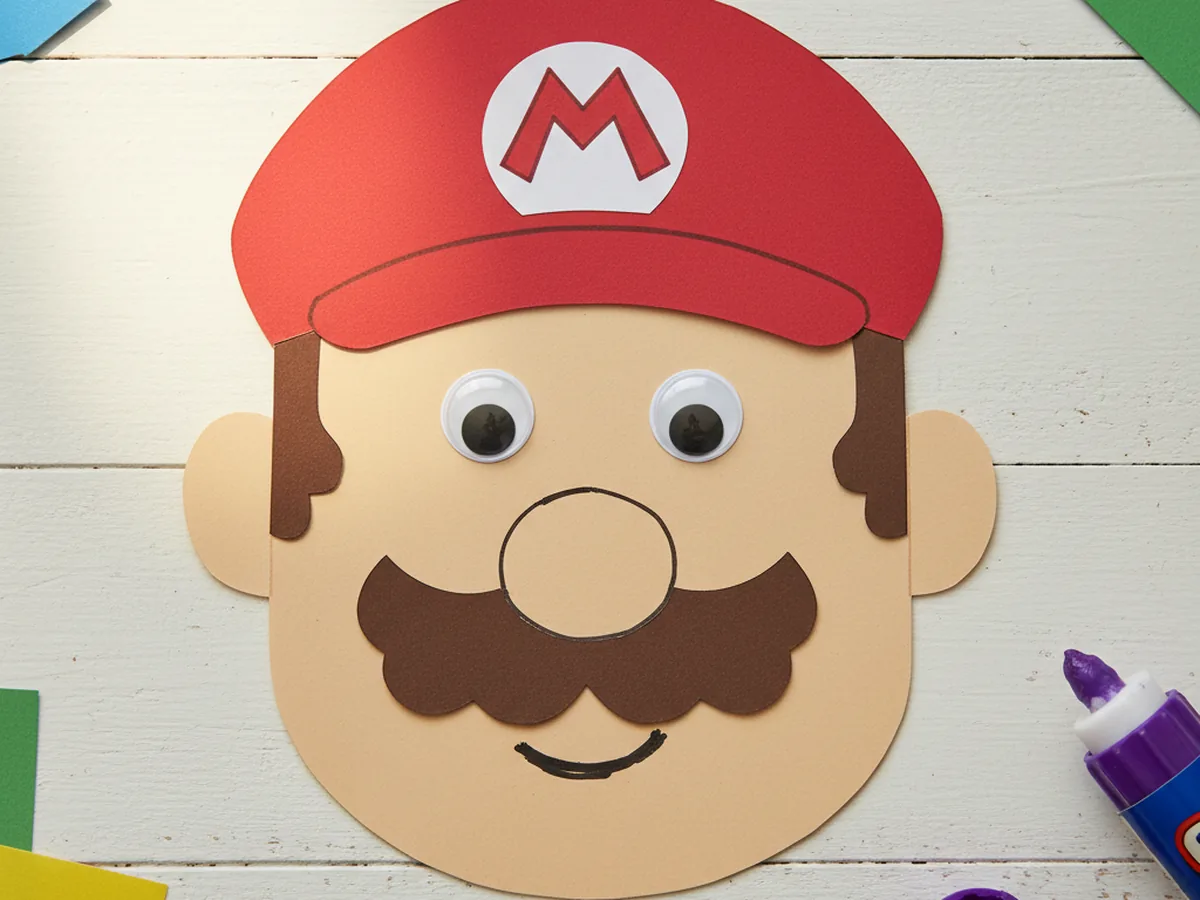
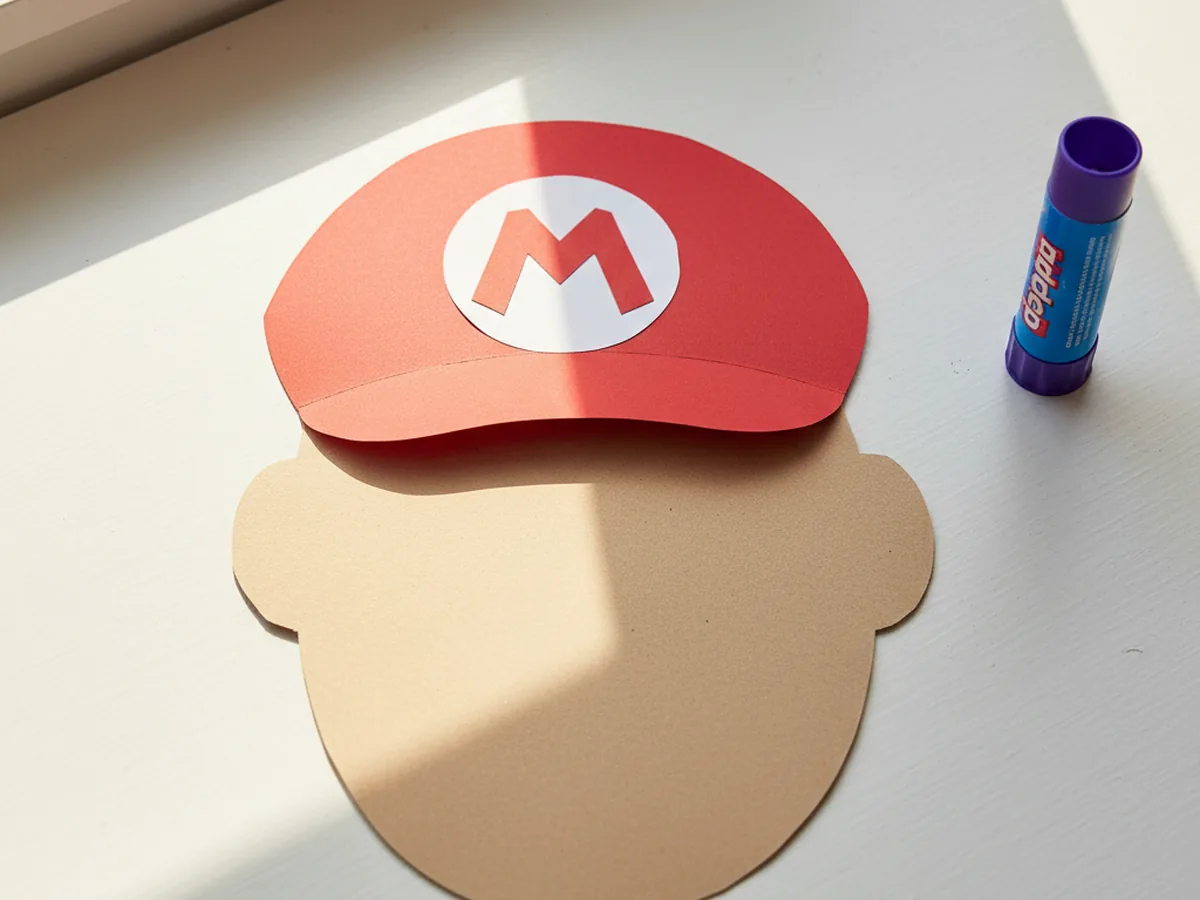
Step 4: Build the Mario Face
Now bring it all together. Lay the tan oval face flat on the table. Run a line of glue across the top of the oval, then press the red cap right over the upper third of the face so the bottom of the cap sits about halfway down the forehead. Add the curved brim if it is a separate piece. Then glue the white circle to the front of the cap and the red M right in the center of the circle.
When you take a step back, the mario paper craft already looks like a real little character, even with no eyes or mustache yet. Most kids gasp a little here, and that is the magic moment of the whole project.
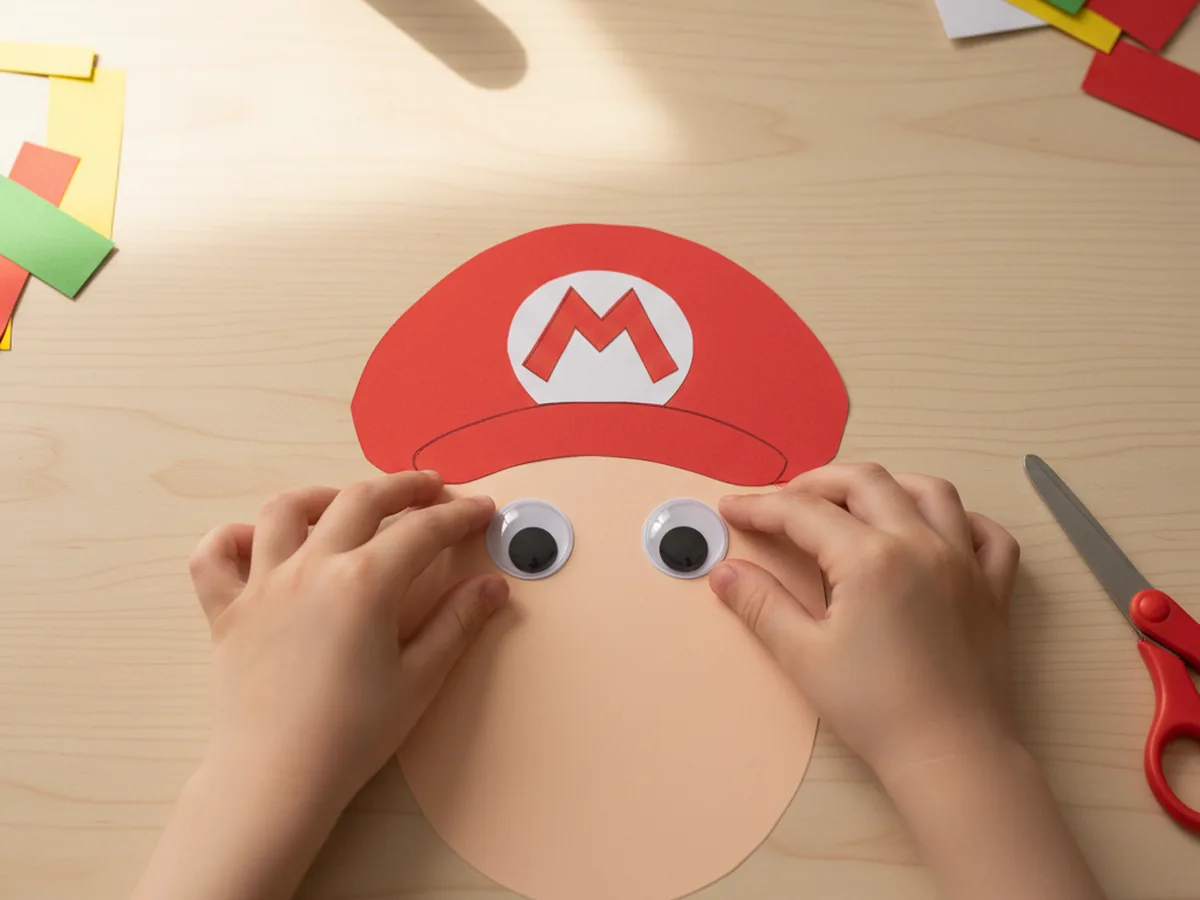
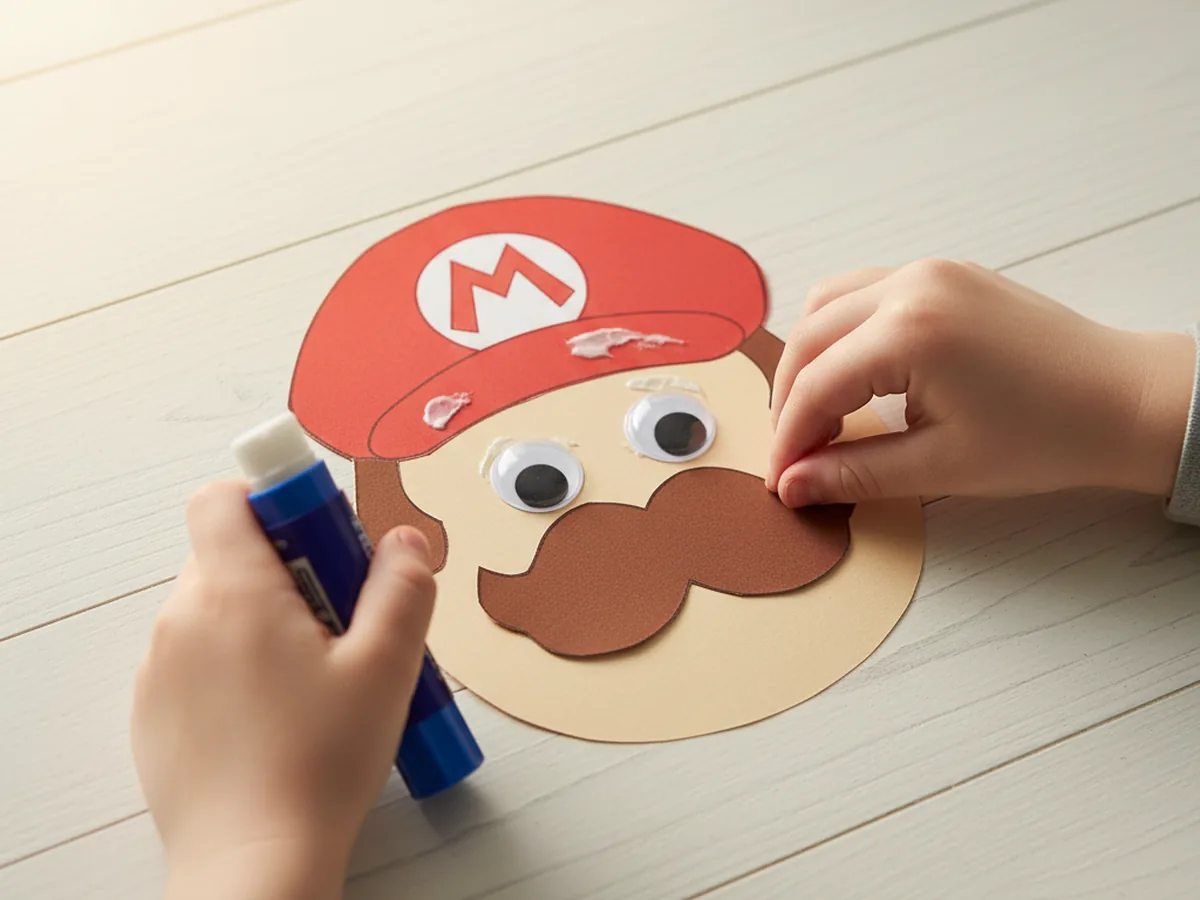
Step 5: Add the Eyes
Peel the backing off two self-adhesive googly eyes and let your child press them firmly onto the upper half of the tan face, just below the brim of the cap. Leave a small space between them so the nose has room to go in the middle. Two medium googly eyes work beautifully, and you can also stick a tiny black paper pupil onto each one if you want a stronger expression.
The moment those eyes go on, the paper mario character suddenly has personality. Our last one ended up looking very excited, like he had just spotted a coin, and the kids laughed about it for ages.
Step 6: Cut and Glue the Mustache
Take a piece of brown construction paper and draw a thick mustache shape with two curved bumps on top and a small dip in the middle, with two soft points curling down on each side. Aim for a wide, chunky mustache, roughly three to four inches across. Cut it out and have your child glue it just below where the nose will go, centered under the eyes.
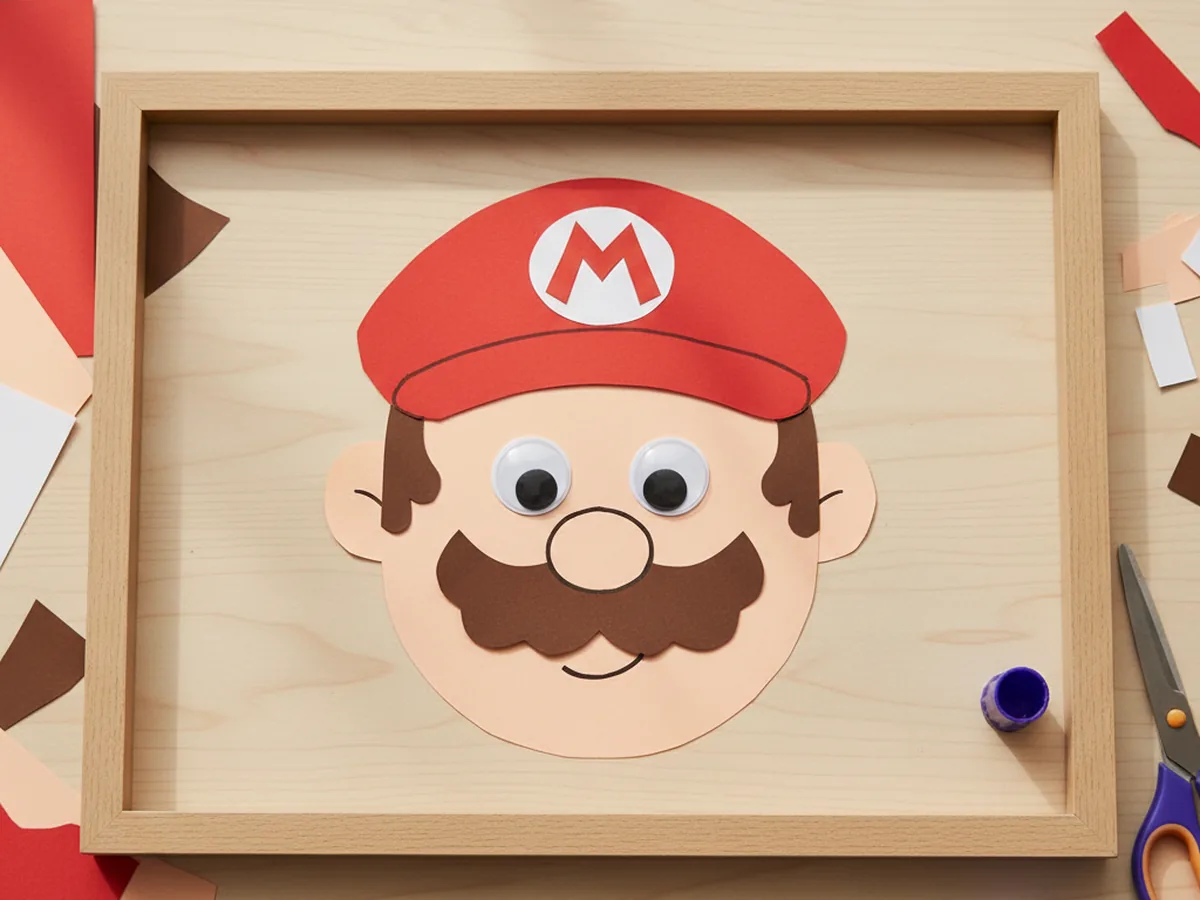
Step 7: Draw the Final Details
Time for the finishing touches. Use a black washable marker to draw a small rounded nose right above the mustache, just between the eyes. Add a simple curved smile peeking out from under the mustache. Then cut two small skin-tone half-circles for ears and glue them to the sides of the face, just below the brim of the cap. A few light dots on the cheeks add an extra friendly touch.
Once the mario paper craft is fully finished, hold him up in front of your child and do your best "It's a-me!" voice together. Most kids burst into giggles right then, and that is exactly the moment this whole project is for. 💛
Variations to Try
Luigi Paper Version: Swap the red cap and the red M for green, and use a slightly thinner mustache shape. You can make Mario and Luigi side by side so siblings can each take home their favorite brother. This version is wonderful for two-child crafting sessions.
Princess Peach Paper Craft: Skip the cap and the mustache entirely. Instead, cut a tall yellow rectangle for hair with curled paper ends, and top the face with a small gold construction paper crown. Add a small pink heart on the cheek for a fun finishing detail.
Paper Plate Mario: Use a small white paper plate as the base instead of cutting an oval. Color or paint the front of the plate a soft peach tone, then build the cap, eyes, and mustache the same way. The paper plate gives the craft a sturdier shape that is perfect for hanging on a bedroom wall.
Final Thoughts
This mario paper craft tutorial is one of those projects that feels almost too simple for how charming the finished face turns out. It uses a handful of basic supplies, takes about 30 minutes, and leaves you with the kind of little keepsake a child runs to show off to anyone who walks through the door. More than that, it gives both of you a slow, joyful moment of making something together. 🎨
If your little one makes their own paper Mario, I would love to see it. Pin this tutorial on Pinterest so other craft-loving mamas can find it easily. Happy crafting!
More Crafts You'll Love
If your little one enjoyed this mario paper craft, they will adore these other fun paper character crafts too: