
Squirrels are one of those little animals kids spot everywhere, darting up trees and stuffing their cheeks with acorns, so they make the sweetest subject for a cozy afternoon project. This paper squirrel craft turns a few pieces of brown paper into a chubby little squirrel with a great big fluffy tail, and the whole thing comes together in about thirty minutes. No painting, no mess, just simple cutting and gluing that even little hands can manage. 🐿️
The best part about this easy paper squirrel craft is how the cute factor builds piece by piece. First a round body, then that signature curly tail, then a tiny acorn tucked in its paws, until your child is holding up a squirrel that looks ready to scamper off the table. It is a gentle, low-stress craft that works just as well for a wiggly toddler as it does for a focused older kid.
Why Kids Love This Craft
Kids adore animals they can recognize, and a paper squirrel craft feels like making a real little friend. That huge fluffy tail is the showstopper every time, and children get such a kick out of seeing their plain brown body suddenly look like an actual squirrel once the tail goes on. Adding the tiny acorn at the end is pure delight, because now their squirrel has something to hold and a sweet little story to go with it.
This squirrel paper craft is also quietly wonderful for growing hands and brains. Cutting the rounded body and curvy tail builds scissor control, peeling and placing the googly eyes works those tricky little finger muscles, and lining up the pieces helps with planning and spatial awareness. To your child it just feels like play, but so much good learning is tucked inside.
Then comes the proud finish. Holding up a finished squirrel and saying "look what I made" is a real burst of joy for a young child. It is cute, it is theirs, and it looks adorable taped to a window or propped on a shelf as part of a little woodland scene. 💛
What You'll Need
Here is everything you need to make this paper squirrel craft at home. I like to lay the supplies out first so my little one can jump straight into cutting that big fluffy tail.
- Crayola Construction Paper (240 sheets, 12 colors), the brown and tan sheets become the squirrel's body, tail, and acorn.
- Fiskars 5 inch Blunt Tip Kids Scissors (3 pack), safely sized for little hands to snip the curved paper shapes.
- Elmer's Washable School Glue Sticks (30 count), mess-free and easy for small hands to stick each piece in place.
- CCINEE Self-Adhesive Googly Eyes (assorted sizes), peel-and-stick eyes that give the squirrel instant personality.
- Crayola Broad Line Markers (classic colors), for drawing the little nose, smile, and whisker lines.
- A pencil for lightly tracing the body and tail shapes before cutting.
Step-by-Step Instructions
This paper squirrel craft comes together in six gentle steps that move from cutting the shapes to adding the finishing acorn. Take it slow and let your child help with every part they can.
Step 1: Cut the Squirrel Body
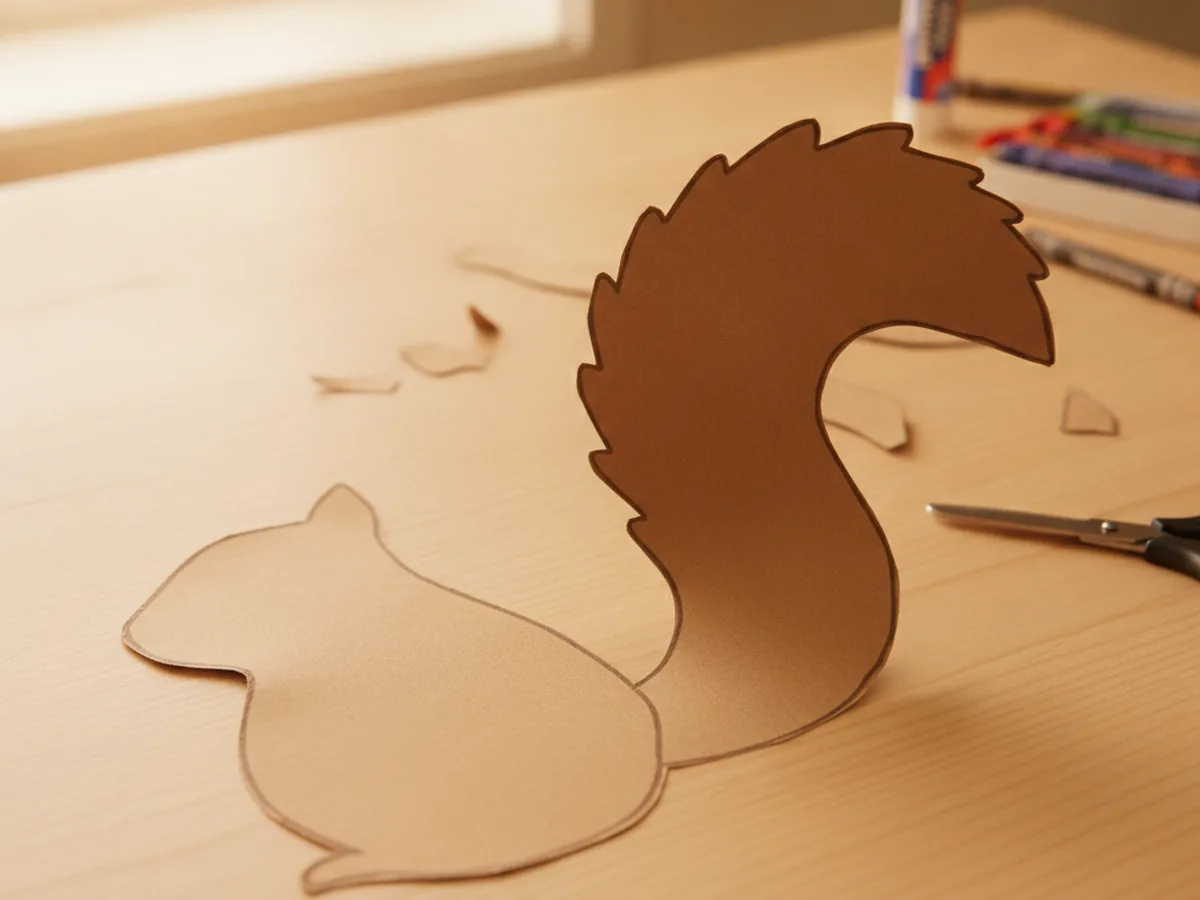
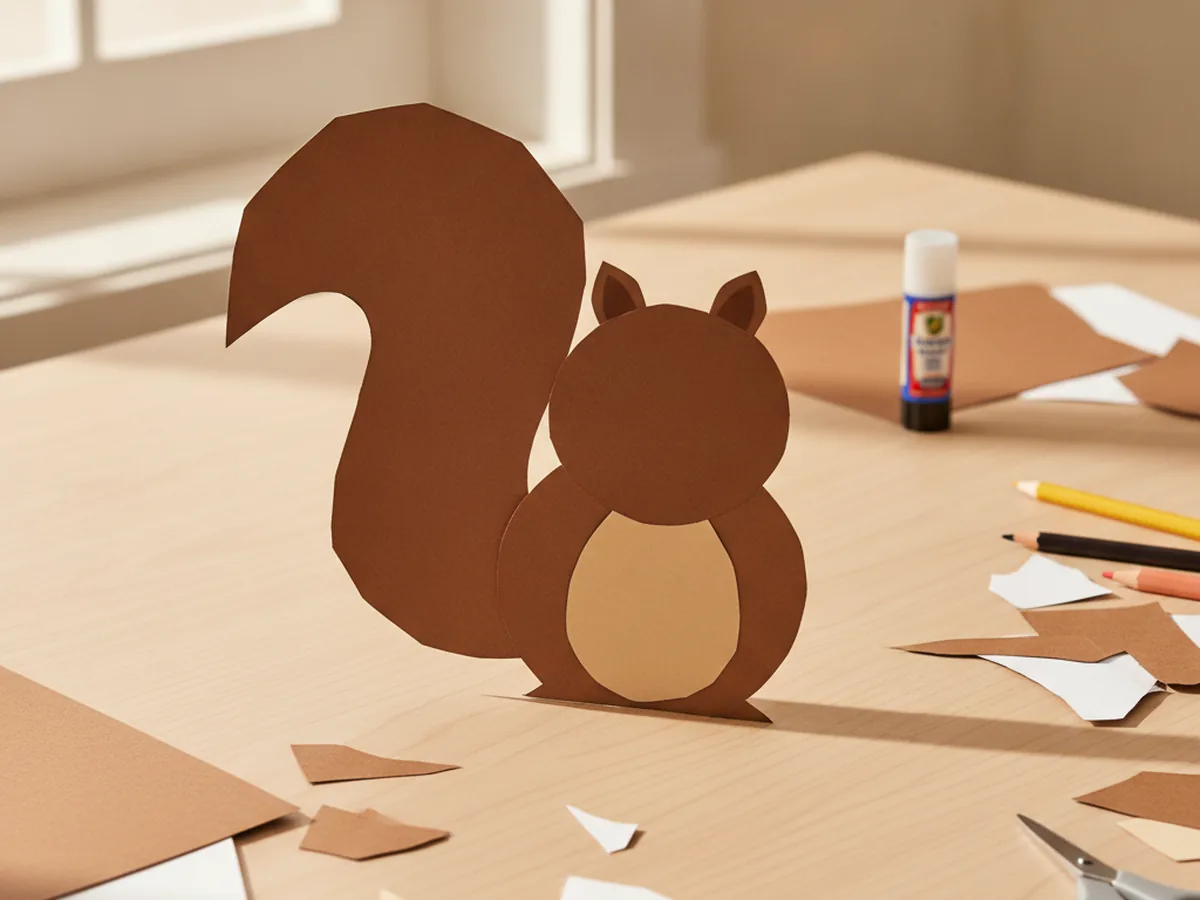
Start with the body, which is the base for your whole squirrel. Cut a plump teardrop shape from brown construction paper, a little rounder at the bottom for the belly and narrower toward the top for the head. Think of a fat little raindrop about the size of your hand. This single shape is the heart of your paper squirrel craft, so keep it nice and chunky so it is easy to decorate later.

Step 2: Cut the Big Fluffy Tail
Now for the star of the show, that famous squirrel tail. Cut a large curved shape from brown paper, almost as big as the body, that swoops up and over like a question mark. Give the outer edge a few gentle bumps or wavy lines so it looks soft and fluffy. The bigger and curvier the tail, the more your cute paper squirrel craft will look like the real thing.
Step 3: Cut the Ears, Paws, and Tummy
Time to make the little details that bring the squirrel to life. Cut two small rounded ears from brown paper, two tiny front paws, and one rounded tan oval for the tummy patch. The tan tummy is what makes the squirrel look soft and cuddly, so pick the lightest brown or beige sheet you have. Your simple paper squirrel craft is really starting to take shape now.
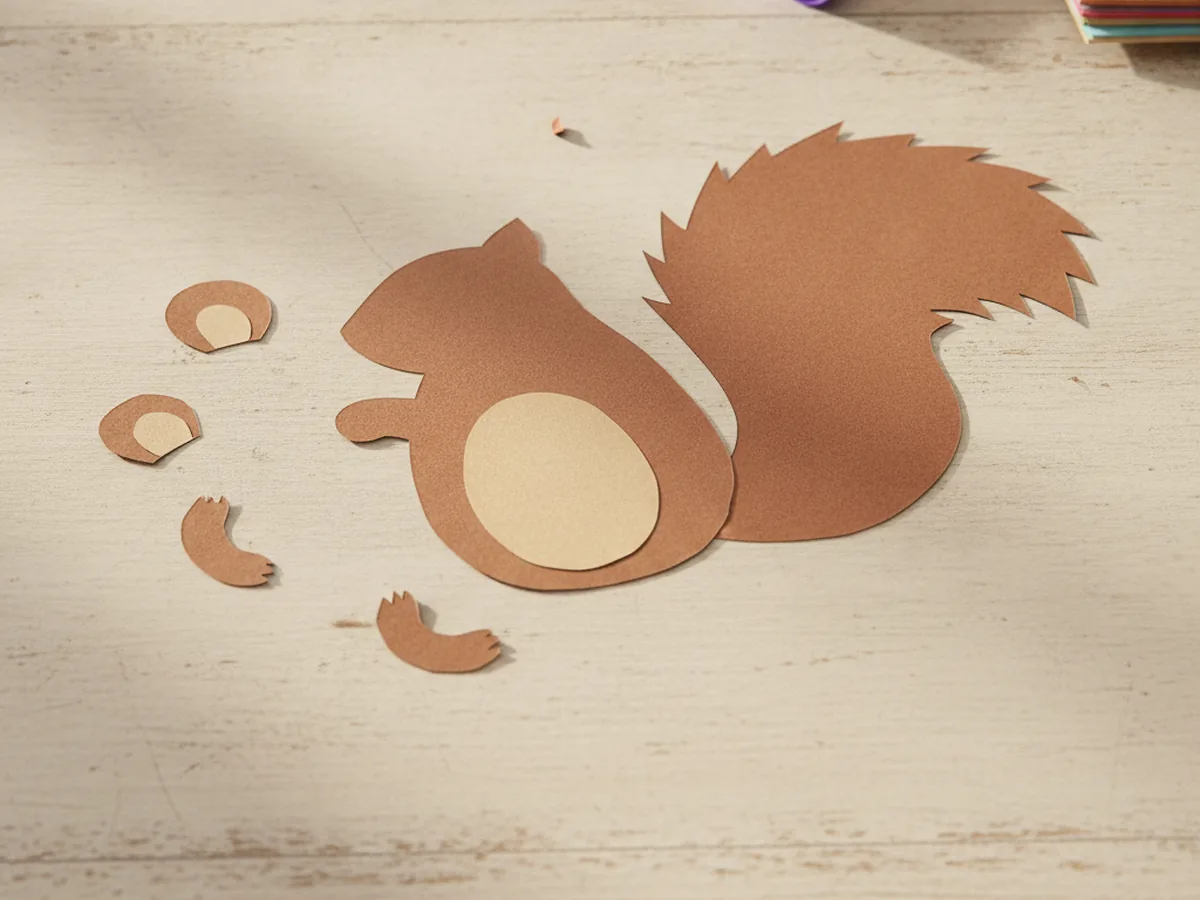
Step 4: Glue the Tail, Tummy, and Ears
Now everything starts coming together. Slide the big fluffy tail behind the body so it curves up along one side, and glue it in place. Then glue the tan tummy patch onto the lower front of the body, and add the two rounded ears at the top of the head. Press each piece down firmly so the glue grabs. Suddenly your paper squirrel craft looks like a real little animal.
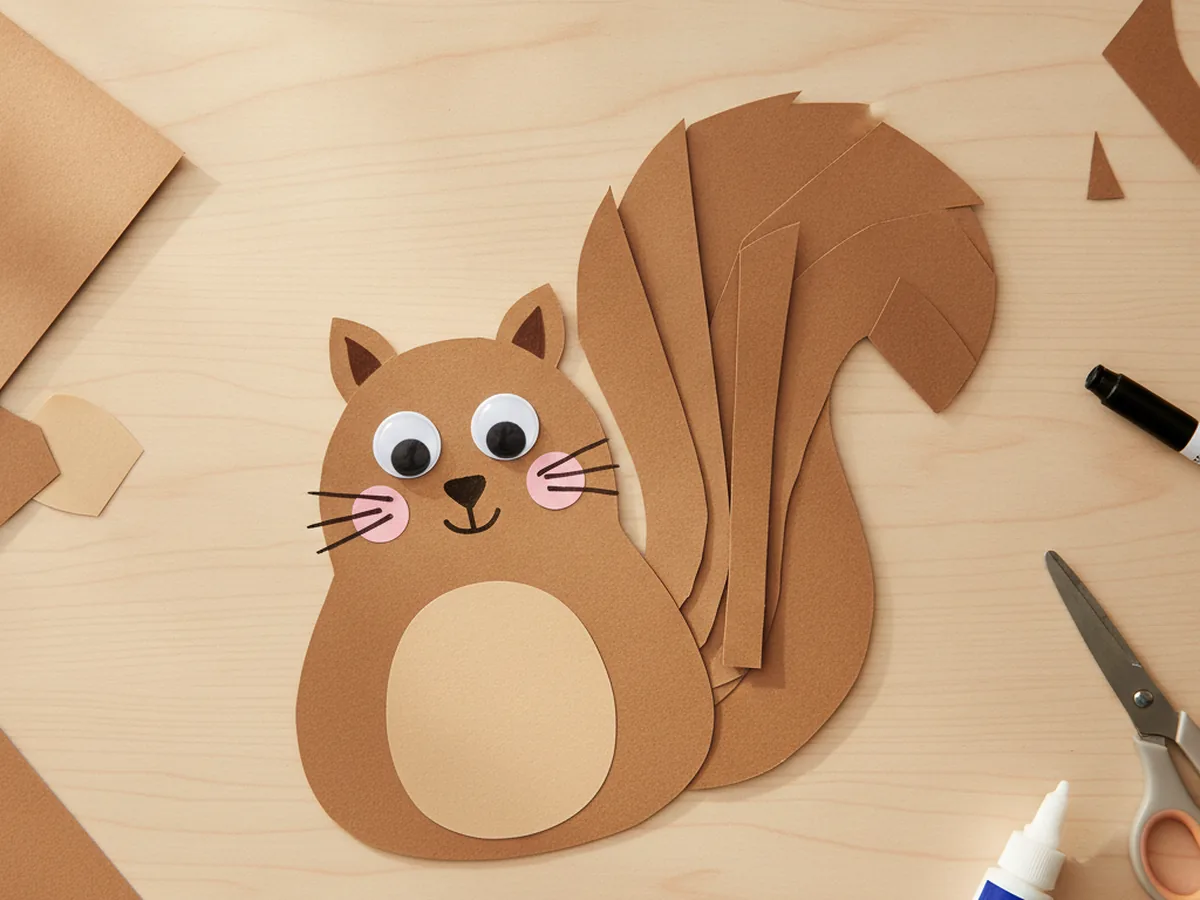
Step 5: Add the Face
This is the moment your child has been waiting for, giving the squirrel a face. Peel and stick two googly eyes near the top of the head, then use a marker to draw a small nose, a sweet little smile, and a few thin whisker lines on each side. A tiny dot of pink on each cheek is adorable if you want to add it. Watch how your easy paper squirrel craft instantly comes alive with personality.
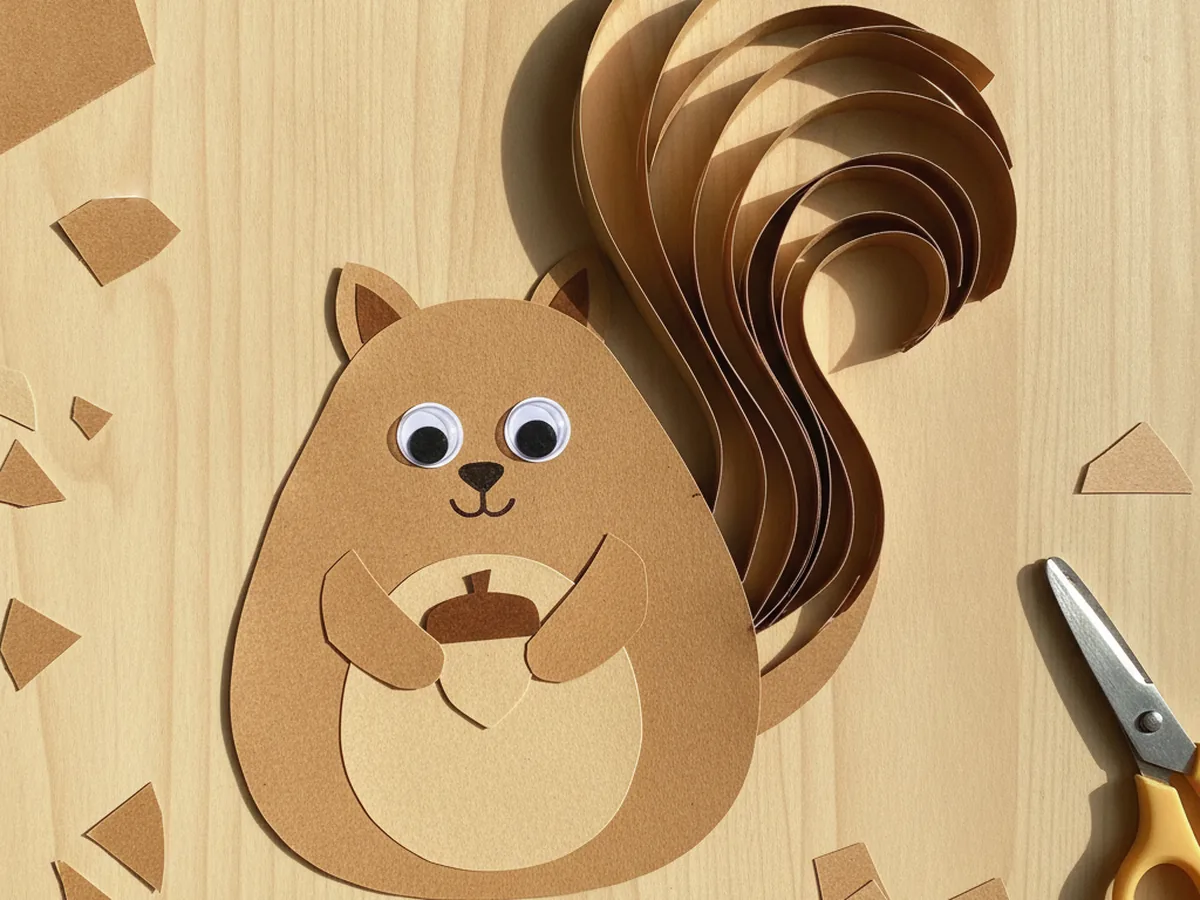
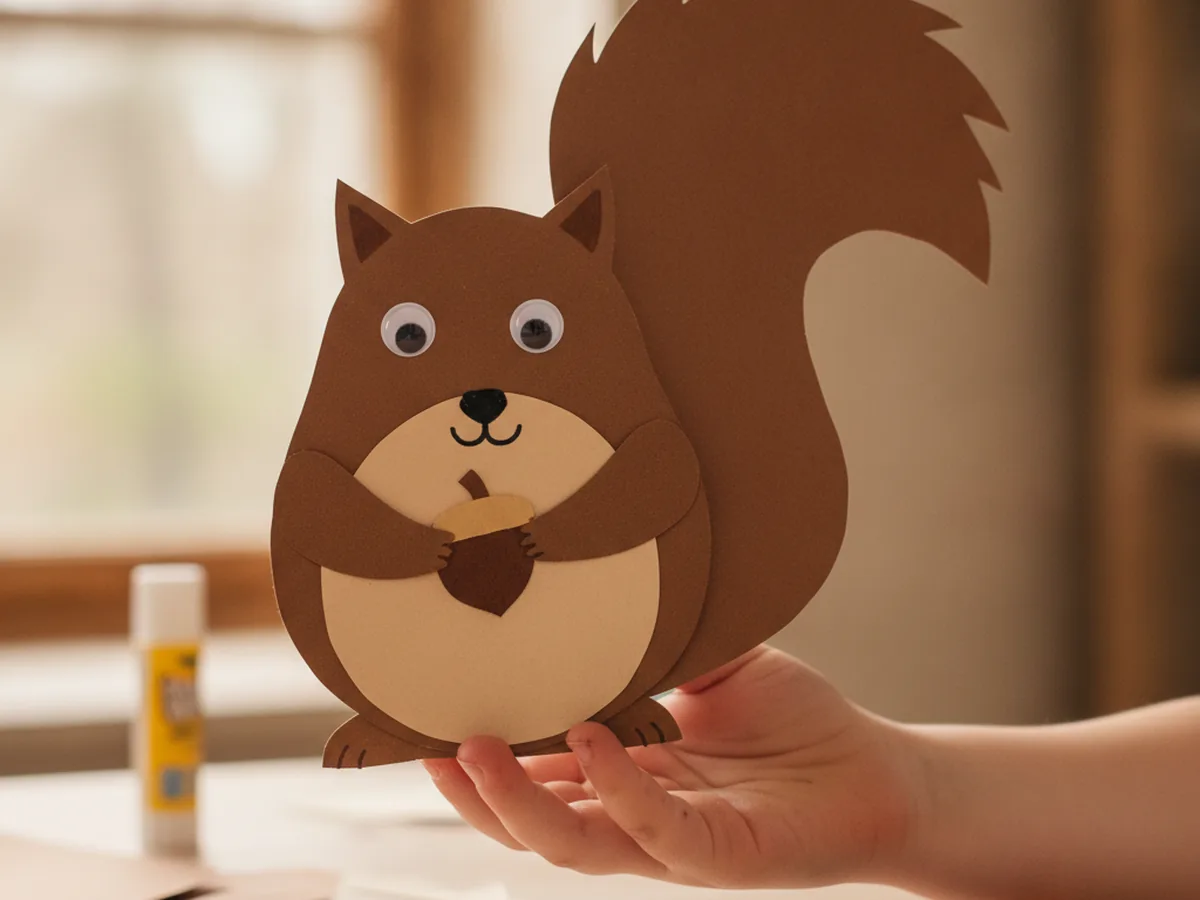
Step 6: Finish with a Little Acorn
Finish your paper squirrel craft by making the acorn every squirrel loves to hold. Cut a small brown oval for the nut and a little tan cap for the top, and glue them together. Then glue the two front paws onto the tummy and tuck the acorn right between them. Step back and take a look, because your child now has a chubby little squirrel holding its very own acorn. Give it a name and find a fun spot to display it. ✨
Variations to Try
Fall Leaf Scene: Glue your finished squirrel onto a sheet of light blue or green paper and add a few cut paper leaves in red, orange, and yellow around it. This turns the craft into a cozy autumn picture that looks lovely on the fridge.
Cotton Ball Tail: For a soft three dimensional twist, skip the paper tail and let your child glue cotton balls or a strip of fuzzy yarn along the tail area instead. It adds real fluffy texture that little ones love to pet.
Squirrel Family: Cut a few bodies in different sizes to make a whole squirrel family, from a big mama squirrel down to a tiny baby. Lining them up by size is a sweet, sneaky way to practice big and small together.
Final Thoughts
This paper squirrel craft is one of those easy projects that turns an ordinary afternoon into a sweet little moment together. A few shapes of brown paper, one big fluffy tail, and a tiny acorn are all it takes to make your child feel proud and happy. Make one cheerful squirrel, or a whole busy family of them, and enjoy the smiles as your little one shows off the cuddly woodland friend they made all by themselves. 🍂
More Crafts You'll Love
If your child loved this paper squirrel craft, these other cozy woodland paper projects are perfect to try next: